Build a basic all-in-one lab in VirtualBox. This how-to shows you how to build a virtual Windows Active Directory environment isolated from your home or work network. See my follow-up post using VMware Workstation here: https://smudj.wordpress.com/2019/01/23/setting-up-an-all-in-one-windows-ad-test-environment-vmware-workstation-edition/
Note: I’m no AD expert, there are better, worse, and different ways to do this and you’re not required to use VirtualBox.
Requirements:
16GB RAM minimum
SSD or multiple HDDs
Quad-core or better CPU with hardware virtualization enabled
- Download the necessary software. Download the ISOs for the OSes you’ll be installing. For this example, I’ll be using IPFire and MSDN versions of Windows Server 2012R2 and Windows 10 Pro.
- VirtualBox: https://www.virtualbox.org/wiki/Downloads
- Windows OS Evaluation: https://www.microsoft.com/en-us/evalcenter/
- IPFire: https://www.ipfire.org/download/ipfire-2.21-core124
- Create your IPFire router VM
- Click New, enter the name of your router, ie “IPFire”
- Change the OS to Linux, Ubuntu 64bit is fine as the version. Click Next.
- Enter 512MB for memory. Click Next.
- Click Create for a new virtual HDD and select VDI. Click Next.
- Select Dynamically allocated and click Next.
- Change the location here if necessary. The 10GB default is large enough, click Create.
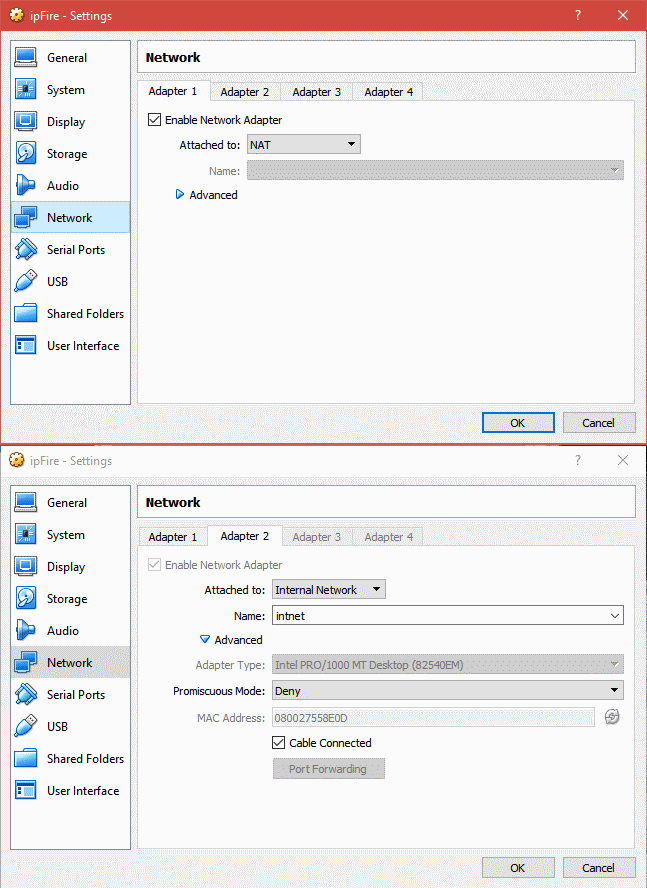
- Once created, click Settings and then click Network. We need to modify the networking options.
- Adapter 1 should be set to NAT or Bridged.
- Adapter 2 needs to be enabled and set to Internal Network. **Make note of the MAC address for adapter 2. You can find it by expanding the Advanced tab.**
- Click OK.
- Mount the IPFire ISO and install
- Click Settings on the IPFire VM. Click Storage.
- Click “Empty” next to the CD icon. Click the CD icon next to the far right to mount the ISO.
- Select “choose a virtual optical disk file” and browse to the ISO’s location.
- Select to mount. Click Ok to close the window.
- Power on the VM.
- Follow the IPFire prompts. Press enter to select, tab to move between selections, and the space bar to select check boxes.
- All defaults can be used.

- Configure IPFire
- Select the keyboard mapping. I’m using “us.” Press Enter to accept.
- Set your timezone. By pressing the first letter of your timezone, you can jump to that section. Select the correct timezone via the arrow keys and press Enter to accept.
- Enter a host name, the default is fine for our lab. Press Enter twice.
- The default domain is fine for our lab, press Enter twice to continue.
- Enter the root password and press Enter each time and once more to continue.
- Do the same for the admin password. Password can be the same for both for our lab purposes.–Network Configuration–
- Press Enter for “network configuration type”
- Select “Green + Red” and press Enter
- Arrow down to “drivers and card assignments.” and press Enter.
- Green: This is our internal network. Press Enter to select. Compare the MAC and select the correct interface. Press Enter to select the Interface.
- Red: This is our internet facing network, NAT or Bridged. Select RED, press Enter, and press Enter again to select the remaining interface.
- Tab over to done and press Enter.–Address Settings–
Press Enter to select.
GREEN:
1. Select GREEN and press Enter.
2. This is a new private, virtual network for our lab. Select a different IP subnet than your host network to avoid confusion.
3. The IP warning can be ignored as we are not logged in remotely. In this example, the subnet is 192.168.211.1/24. Since this will be the gateway, we can use 192.168.211.1. The subnet mask does not need to change.
4. Press Enter until you return to the GREEN/RED menu.
RED:
1. Select RED and press Enter.
2. Select DHCP. This interface will get the IP from the VBox NAT or your physical network’s DHCP server. You can modify the hostname here if necessary.
3. Tab to Done and press Enter.
–DNS and Gateway settings–
1. DNS and Gateway settings are only needed if using a static IP. Since we are using DHCP, there is nothing to change here. Tab to Done and press Enter.–DHCP Configuration–
We will be using Windows DHCP instead of IPFire’s. Tab to OK and press enter without enabling DHCP. Press Enter to close setup.
- Create Windows Server 2012 R2 VM
- From the VBox main men, click New.
- Enter a name, ex: “WS2012R2”, select the appropriate type (Windows 2012) and version (64-bit). Click Next.
- Set RAM to 4096MB. If you have more than 16GB of RAM, you can increase to 6 or 8GB, if needed. Click Next.
- Create a new virtual hard disk, click Create.
- Select VDI and click Next.
- Select Dynamically allocated, and click Next.
- Enter 80GB and click Create.
- Click Settings, then click Network.
- Select Internal Network.
- Select Storage. Click the CD under storage devices, then click the CD icon to the left of Optical Drive.
- Select Choose virtual optical disk file. Browse and select your Windows Server ISO.
- Click OK.
- Install Windows Server 2012
- Install Windows as you normally would.
- Configure Windows Server and Domain
- Enter the IP information. The IP needs to be on the same subnet as configured for the GREEN network. EX: 192.168.211.200, GW: 192.168.211.1, DNS: 127.0.0.1 since we’ll be creating a domain controller with DNS and DHCP services.
- You should be able to ping an IP address, but not a DNS name.
- Change the name of your server and reboot.Start the Add Roles and Feature Wizard
1. Add the following roles:
–Active Directory Domain Services
–DHCP Services
–DNS Services
2. Follow the wizard’s steps.
3. Promote: Add a new forest.
4. Enter your domain name and follow the wizard. –you will get a warning about DNS, this will be resolved later.
- Configure DNS and DHCP
DNS. We need to add a forwarder for our DNS settings.
1. From Administrative Tools, open DNS
2. Right-click on your server and click Properties.
3. Click the Forwarders tab
4. Click Edit, and add your external DNS servers like 4.2.2.1, 4.2.2.2, 8.8.8.8, and 8.8.4.4.
DHCP
1. Double-click DHCP from Administrative Tools
2. Expand IPv4 and right-click, click New Scope from the menu.
3. Enter an IP range, ex: 192.168.211.50 to 192.168.211.100
4. The remaining settings can be default for now.
5. When asked to configure scop options, verify “Yes” and click Next.
6. Router/Default gateway will be the IP we used to configure the GREEN NIC, ex: 192.168.211.1
7. Domain name and DNS should be pre-configured. You should see the server’s IP in IP address box, ex: 192.168.211.200
8. WINS does not need to be configured at this time.
9.When prompted to activate scope, verify “Yes” and click Next.
10. Click Finish to complete the wizard.
Right-click on the server’s name under DHCP, and click Authorize from the menu. Refresh and IPv4 should have a green circle with a white check mark.
9. Managing IPFire via web interface
You can access IPFire’s management console via a web browser.
Enter https://ipfire_ip-address:444, ex: https://192.168.211.1:444
Use “admin” and the password entered during step 4.
Note: You will get a certificate error when accessing the IPFire management page.

9. Adding Client VMs.
Nothing special here. Install Windows/Linux as usual. Make sure to select Internal Network for the VM’s network
10. Completion!
Here’s the money shot:
-VirtualBox
-IPFire VM
-WS2012R2 VM – domain controller for sw.net, DHCP and DNS roles
-Win10 VM – joined to sw.net, displaying IPFire’s web management page and network settings.


