Posts Tagged ‘Windows 10’
Posted by essjae on March 18, 2019
A lot of lab tutorials assume you have access to powerful systems with 32 or 64GB of RAM, RAID arrays, dual CPU server systems and so on.
Like my VMware Workstation set up here:
or VirtualBox
This one’s different. I’m taking a couple relatively modern workstations with 16GB or less RAM each and creating a Windows Active Directory domain environment. The cool thing here is with an extra switch we can add multiple physical systems into our virtual lab.
Keep in mind that you can still use a powerful workstation/server setup here and just skip setting up the second physical workstation and end up with the same setup as the VMware Workstation or VirtualBox tutorial.
Hardware used:
Workstation 1 (W1): Windows 10 Pro (1809) with Hyper-V, i5-4570, 16GB RAM, 500GB SSD, dual NICs (one onboard NIC, one SB3 1Gb NIC)
*workstation 1 requires 2 network cards.
Workstation 2 (W2): Windows 10 Pro (1809) with Hyper-V, i7-870, 12GB RAM, 256GB SSD, onboard NIC
optional: Ethernet switch (not used in your existing network environment), additional Windows 10 Pro, Windows Server, Hyper-V Server workstations
ISO media needed:
At the time of writing Windows Server 2012–2019 are currently available. This lab will use Windows Server 2016.
Optional ISOs
Download these ISOs and place then in an easily accessible location for later use.
- Hardware Setup
- Connect both NICs in W1.
- NIC1 will be connected to your regular network environment
- NIC2 will be connected to W2 directly, or to the optional switch
- Assign a static IP to NIC2
- IP Address: 172.16.1.100
- Subnet mask: 255.255.255.0
- Assign static DNS to NIC2
- Primary: 172.16.1.201 Hint: this will be the IP of our Windows domain controller
- Connect NIC in W2 to switch**, if not directly connected to W1. **Most modern NICs no longer need a crossover cable to directly connect. If you’re having issues with a connection, a switch should resolve this, or a cross-over cable.
- Virtual router Setup for Internal lab environment
- Create virtual switches on W1
- Start Hyper-V Manager
- Click Virtual Switch Manager
- Select External, and click Create Virtual Switch
- Under Name, enter External Access, and assign the NIC connected in step 1 above to your regular network environment, and click OK.

- Click select External, Create Virtual Switch again. Under Name, enter Internal Lab, select the second NIC and click OK.
- Click OK to exit the Virtual Switch Manager.
- Set IP Address for second NIC.
- Go to Control Panel, Network and Sharing Center and click Change Adapter Settings
- Right-click on vEthernet (Internal Lab) and select Properties.
- Select Internet Protocol Version 4 (TCP/IPv4), then click Properties.
- Enter the following IP information:
- IP Address: 172.16.1.100 <– this is the address of W1 in the internal lab network
- Subnnet mask: 255.255.255.0
- Default gateway: 172.16.1.1 <– this is the address of the virtual router we will set up next
- Click Ok. Click Close.
- Create the virtual router VM
- Return to the Hyper-V Manager and click New –> Virtual Machine.
- Click Next to begin the wizard, enter the info in the fields and click Next when finished.
- Name: Lab Router
- Generation: Generation 1
- Startup memory: 512MB, uncheck Use Dynamic Memory
- Connection: Select External Access
- Virtual Hard Disk: accept defaults and click Finish
- Select Lab Router from Virtual Machines and click Settings.
- Select Network Adapter and click Add
- Select Internal Lab from Virtual Switch and click Apply
- Select DVD Drive, then select Image file.
- Click Browse and go to the location where the IPFire ISO is stored. Double-click the ISO. Click OK.
- Start the Lab Router VM.
- Click Start, then Connect.
- Install IPFire.
- Press Enter to begin the installation. Note: Window title will appear before instructions for this section.
- Language selection: Press Enter to accept English
- IPFire: Press Enter to Start installation
- License Agreement: Press tab to move to license acceptance box, then press the spacebar to accept. Press tab and Enter to complete.
- Disk Setup: Press Enter to accept and Delete all data
- Filesystem Selection: Press tab and Enter to accept the default.
- Congratulations: Press Enter to reboot
- Configure IPFire Pre-config info.
- While IPFire is rebooting, we need to determine which NIC’s MAC address is the External Lab’s.
- In the Hyper-V Manager with Lab Router selected, click Settings.
- Click on plus (+) next to Network Adapter External Access, then click Advanced Features to view the adapters MAC.

- Leave this window open, or make note of the MAC as we will need it soon.
- Configure IPFire
- Keyboard Mapping: Press Enter to select the default mapping.
- Timezone: Choose the correct timezone and press enter. Hint: pressing a letter will jump to that section. US Pacific (press P and arrow to PST8PDT) can be found this way quickly.
- Hostname: Press Enter twice to accept the default, ipfire.
- Domain name: Press Enter twice to accept the default.
- Root password: Enter a memorable password, tab to the verification field, and tab again to OK. Press Enter. Hint: no characters will appear when entering the password.
- Admin password: Enter a memorable password, tab to the verification field, and tab again to OK. Press Enter. Hint: no characters will appear when entering the password. Extra hint: for our lab, this can be the same password as the root account for simplicity.
- Network configuration: network configuration type: GREEN + RED should already be selected.
- Arrow key down to select Drivers and card assignments, press Enter
- Assigned cards: GREEN: Press Enter to select. Hint: the GREEN network is our Internal Lab network.
- Choose the card that does NOT have the MAC from step 6.3. Use the arrow key to highlight and press Enter
- Assigned cards: use the arrow keys to highlight RED, and press Enter
- Press Enter to select the remaining card.
- Assigned cards: press tab to move and highlight Done. Press Enter
- Arrow key down to select Address settings and press Enter
- Address settings: GREEN. Press Enter to reconfigure
- Warning: press Enter. Hint: we are not connected remotely, so this does not apply
- Interface GREEN: IP Address: 172.16.1.1 Network mask: 255.255.255.0 Press tab to move between fields, press Enter when complete
- Address settings: RED: Press Enter to reconfigure.
- Down arrow key to select DHCP, press spacebar to select. Tab to OK and press Enter. Hint: our external network will use the existing network DHCP server
- Address settings: Press tab to move to Done, press Enter.
- Arrow key down to Done and press Enter. Hint: we do not need to set the DNS and Gateway settings, the DHCP option selected above in 9-2 will autopopulate this for the RED network.
- DHCP server configuration: We will use the DHCP and DNS services on our Windows Server VM that we will set up later.
- Tab to OK and press Enter to leave the IPFire DHCP server unconfigured.
- Setup is complete: Press Enter. IPFire will reboot.
- IPFire/Lab Router VM should remain running.
- Close the Lab Router settings window, if needed.
- Windows Server (Domain Controller) for Internal Lab environment
- Create Windows Server VM
- Return to the Hyper-V Manager and click New –> Virtual Machine.
- Click Next to begin the wizard, enter the info in the fields and click Next when finished.
- Name: Windows Server 1
- Generation: Generation 1
- Startup memory: 4096MB, uncheck Use Dynamic Memory
- Connection: Select Internal Lab
- Virtual Hard Disk: accept defaults and click Finish
- Select Windows Server 1 from Virtual Machines and click Settings.
- Select DVD Drive, then select Image file.
- Click Browse and go to the location where the IPFire ISO is stored. Double-click the ISO. Click OK.
- Install Windows Server 2016
- Start Windows Server 1
- Click Start, and then Connect.
- Install Windows Server 2016
- Click Next to begin the installation
- Click Install now
- Select Windows Server 2016 Datacenter Evaluation (Desktop Experience) and click Next.
- Click I accept the license terms, then click Next
- Click Custom: Install Windows only
- Click Next, to accept the default installation location
- Customize settings: enter a memorable Administrator password, reenter, and click Finish
- Configure Windows Server 1 (WS1)
- Press control+alt+end to log into WS1, or use the menu options: Action–>Control+Alt+Del
- Go to the Control Panel, change View by to Small Icons
- Click Network and Sharing Center
- Click Change Adapter Settings
- Right-click Ethernet and click Properties
- Select Internet Protocol Version 4 and click Properties
- Click Use the following IP address:
- IP Address: 172.16.1.201
- Subnet mask: 255.255.255.0
- Default gateway: 172.16.1.1
- Click Use the following DNS server addresses
- Preferred DNS server: 172.16.1.201 Hint: We will setup AD, DNS, and DHCP on this server
- Click OK, then click Close
- Networks: when prompted, click Yes to allow your PC to be discoverable.
- In Control Panel, go to System. Under Computer name, click Change Settings.
- Click Change, enter WS1, as the computer name. Click OK. Click OK at the prompt
- Click Close
- Click Restart Now
- Setup WS1 as a domain controller with DHCP
- Start the Add Roles and Feature Wizard
- Add the following roles:
- Active Directory Domain Services
- DHCP Services
- DNS Services
- Follow the wizard’s steps. All the defaults can be used for our lab purposes.
- Promote: Add a new forest.
- Enter the domain name, Hyper-LAB.net, and follow the wizard. Hint: you will get a warning about DNS, this will be resolved later.
- More details for setting up an DC in Windows 2016 can be found here: https://blogs.technet.microsoft.com/canitpro/2017/02/22/step-by-step-setting-up-active-directory-in-windows-server-2016/
- Configure DNS and DHCP
- Log into your new domain controller.
- DNS. We need to add a forwarder for our DNS settings.
- From Administrative Tools (or Server Manager–>Tools), open DNS
- Right-click on your server and click Properties.
- Click the Forwarders tab
- Click Edit, and add your external DNS servers like 4.2.2.1, 4.2.2.2, 8.8.8.8, and 8.8.4.4.
- Click OK, when completed. Click OK, to close Properties.
- Close the DNS Manager
- DHCP
- Double-click DHCP from Administrative Tools or Server Manager–>Tools
- Expand IPv4 and right-click, click New Scope from the menu.
- Enter a Name: Hyper-Lab client scope, click Next
- Start IP address: 172.16.1.50
- End IP address: 172.16.1.99
- Length: 24 or Subnet mask: 255.255.255.0
- Click Next
- The remaining settings can be default for now.
- When asked to configure scope options, select “Yes” and click Next.
- Router/Default gateway will be the IP we used to configure the GREEN NIC, enter: 172.16.1.1. Click Add. Click Next.
- Domain name and DNS should be pre-configured. You should see the server’s IP in IP address box, 172.16.1.201. Click Next.
- WINS does not need to be configured at this time. Click Next.
- When prompted to activate scope, select “Yes” and click Next.
- Click Finish to complete the wizard.
- Right-click on the server’s name under DHCP, and click Authorize from the menu. Right-click the server name and click Refresh and IPv4 should have a green circle with a white check mark

- WS1 configuration is complete. You should be able to ping an IP address, ex: 4.2.2.2 as well as a DNS name: ex: http://www.google.com
- Workstation 2 setup and configuration
- After the successful configuration of WS1, a network prompt on W2 should appear

- Verify DHCP is configured for W1, if no prompt
- Networks: when prompted, click Yes to allow your PC to be discoverable
- Ping will not work until we disable the firewall, or turn on file and print sharing for the Private network.
- Set a static IP for W2:
- IP Address: 172.16.1.101
- Subnet mask: 172.16.1.1
- DNS: 172.16.1.201
- Configure an External Virtual Switch
- Create virtual switches on W1
- Start Hyper-V Manager
- Click Virtual Switch Manager
- Select External, and click Create Virtual Switch
- Under Name, enter Internal Lab, and assign the NIC and click OK.
- If the network is set to public, we need to change it to private
- Open an elevated Powershell
- Set Internal Lab to private: Set-NetConnectionProfile -InterfaceAlias “vEthernet (Internal Lab)” -NetworkCategory Private Hint: If the Default Switch is set to Public, we need to change that one also
- Set Default Switch to private: Set-NetConnectionProfile -InterfaceAlias “vEthernet (Default Switch)” -NetworkCategory Private
- Enable firewall rules and delegation: Enable-WSManCredSSP -Role server
- Set up Remote Desktop for W2
- Go to Control Panel, click Category, then Small icons
- Click System
- Click Remote Settings, select Allow remote connections to this computer, uncheck Allow connections only from computers running with NLA
- Click OK
- Configure W1 to access W2’s Hyper-V Manager (optional, we can manage W2 via RDP or directly from W2)
- Complete details found here: https://timothygruber.com/hyper-v-2/remotely-managing-hyper-v-server-in-a-workgroup-or-non-domain/
- When you try to connect with Hyper-V Manager you’ll receive an error from Hyper-V Manager that it’s either not running or you are not authorized.
- Start an elevated PowerShell prompt on W1
- You may need to set the Internal Lab network to private, then we need to add W2 to the hosts file and run winrm quickconfig:
- Set Internal Lab to private: Set-NetConnectionProfile -InterfaceAlias “vEthernet (Internal Lab)” -NetworkCategory Private
- Add W2 to the hosts file: Add-Content -Path C:\Windows\System32\drivers\etc\hosts -Value “`n172.16.1.101`tW2” Hint: the ` is not a single quote, but a grave, the grave/tilde key is left of the 1 key
- Run quickconfig: winrm quickconfig Enter “y” to make the changes.
- Enable delegation: Enable-WSManCredSSP -Role client -DelegateComputer “W2”
- Enable Local Group Policy
- Run gpedit
- Go to Computer Configuration–>Administrative Templates–>System–>Credentials Delegation->Allow delegating fresh credentials with NTLM-only server authentication
- Select Enabled. Click Show, enter wsman/W2. Click OK twice.
- Connect to W2
- In Hyper-V Manager, click Connect to Server
- Select Another Computer, enter W2.
- Select Connect as another user, enter W2\hyperlab1 and the password you set for this account on W2

- Copy the Windows 10 ISO to W2 for setting up a new VM
- Your basic lab is now setup. You can manage both Hyper-V systems from W1
You can add more Hyper-V “servers” to your network with a switch for the Internal Lab network between W1, W2, and the other servers, follow the steps for W2 with each new Hyper-V server.
Keep in mind that you can just use low-end workstations for clients in this scenario also. They just need to be added to the Internal Lab network’s switch.
Posted in Hyper-V, Virtualization, Windows 10 | Tagged: Hyper-V, Hyper-V 10, Microsoft, Virtualization, Windows 10 | 1 Comment »
Posted by essjae on January 23, 2019
Build a basic all-in-one lab in VMware Workstation. This how-to shows you how to build a virtual Windows Active Directory environment isolated from your home or work network. This is a follow-up to my same procedure in VirtualBox: https://smudj.wordpress.com/2019/01/17/setting-up-an-all-in-one-windows-ad-test-environment-virtualbox-edition/.
Note: I’m no AD expert, there are better, worse, and different ways to do this and you’re not required to use VMware Workstation.
Requirements:
16GB RAM minimum
SSD or multiple HDDs
Quad-core or better CPU with hardware virtualization enabled
- Download the necessary software. Download the ISO for the OSes you’ll be installing. For this example, I’ll be using IPFire and the MSDN versions of Windows Server 2016 and Windows 10 Pro.
- VMware Workstation Pro: https://www.vmware.com/products/workstation-pro.html
- Windows OS Evaluation: https://www.microsoft.com/en-us/evalcenter/
- IPFire: https://www.ipfire.org/download/ipfire-2.21-core124
- Create a folder for your test environment.
- In Workstation, right-click My Computer and click New Folder. Enter a name like “Allin1 AD” and press Enter. Click your new folder to select it.
- Create an internal network.
- Click Edit–>Virtual Network Editor.
- Click Change Settings, click Yes at the UAC prompt.
- Click Add Network, select a network. For this example, we’ll use VMnet15. Click OK.
- Under VMnet Information, verify that Host-only is selected.
- Uncheck Connect a host virtual adapter to this network. *This will prevent your physical host from accessing the test environment.
- Uncheck Use local DHCP service to distribute IP address to VMs. *We will use the Windows server’s DHCP and DNS for this environment.
- Change the subnet address to 192.168.15.0 **Any IP subnet can be used here. To prevent confusion, use a unique IP range. 10.0.15.0, 10.15.0.0, 172.16.0.0 and 172.16.15.0 are all alternative options. Choose an appropriate subnet. For the labs purposes, a 255.255.255.0 subnet is acceptable. Click Apply.
- Verify your settings for VMnet15 and click OK.

- Create your IPFire Router VM
- Click File–>New Virtual Machine or CTRL+N.
- Select Custom and click Next to begin the New Virtual Machine Wizard.
- Click Next, the default hardware compatibility is fine.
- Select Installer disc image file (iso) and click Browse. Go to the location from step 1.3 where the IPFire ISO is located.
- Select the ISO and click Open.
- Click Next.
- Select Linux as the guest OS and click Next. *IPFire is built from scratch and not based on any Linux distro.
- Enter IPFire for the VM’s name. Select the appropriate location for your VM. For this document, the name is ipfire-wpdoc and the location is C:\VMs\ipfire-wpdoc
- Click Next.
- One processor is enough for our IPFire router, click Next.
- 512MB is the minimum requirement for IPFire. Click 512MB and click Next. (https://wiki.ipfire.org/hardware/requirements)
- Network type. Select host-only networking and click Next.
- Click Next to select the default I/O controller type.
- Click Next to select the default disk type.
- Click Next to create a new virtual disk.
- Change the disk size to 4GB and click Next. *2GB is the minimum, 4GB is recommended for logs and add-ons. See 4.9 above.
- Click Next to accept the default disk file name and location.
- Click Customize Hardware.
- Click Add…,
- Click Network Adapter.
- Click Finish.
- The new network adapter, network adapter 2, will be selected. Select NAT or Bridged for the network connection. **NAT will provide a more isolated environment, where bridged will allow the IPFire VM an IP address on your host’s network. NAT will be used for this document.
- Click Advanced. Click Generate under MAC Address. Make note of this address. We will need the address when assigning network types in the IPFire installation. Click OK.
- Click Close.
- Click Finish.
- Click Edit Virtual Machine Settings
- Click Network Adapter
- Click Custom, select VMnet15, click OK.
- Drag the IPFire VM into the folder created in 2.1 above.
- Install IPFire
- Click Power on this virtual machine.
- Click the IPFire splash screen and press Enter.
- Press Enter to accept the default language selection.
- Press Enter to Start Installation.
- Press Tab, press the spacebar to select I accept this license. Press Tab again and press Enter.
- Press Enter to Delete all data.
- Press Enter to accept the default file system.
- Press Enter to reboot.
- Configure IPFIre
- Press Enter to select the default keyboard layout.
- Change the timezone. For this document PST8PDT will be used. Press Enter.
- Press Enter twice to accept the default hostname
- Press Enter twice to accept the default domain
- Root password. Enter a password and press Enter twice. Press Enter to continue.
- Enter a password and press Enter twice. *this is for the admin password, it can be the same for simplicity.
- Press Enter to continue.
- Use the arrow key to move down to Drivers and card assignments, press Enter.
- Green — This is our internal test environment network. It will have no direct access to the Internet or the host’s network.
- Press Enter to select
- Compare the MAC addresses and use the one that was not generated in step 4.16.3.2.
- Use the arrow keys to select the correct interface and press Enter. To move between fields, use the Tab key.
- Red — this will allow the test environment external access via the NAT network.
- Use the arrow key to select Red and press Enter.
- There should only be one interface left to select. Press Enter.
- Both network cards should now be assigned. Use Tab to move to Done and press Enter.

- Tab to Address Settings and press Enter.
- Press Enter to reconfigure the Green interface.
- Press Enter to acknowledge the warning. We are not connected remotely, so this does not apply.
- Since we are using the 192.168.15.0 subnet, we will assign a 192.168.15.1 IP address to the Green interface as it will be our gateway IP address. The default subnet mask does not need to be changed. Press Enter three times to accept the IP, subnet, and return to Address Settings.
- Use the arrow key to select Red. Press Enter.
- The Red interface will get an IP address from Workstation’s NAT. Using the arrow keys and spacebar, select DHCP. Use Tab to move to OK and press Enter.
- Use Tab to move to Done and press Enter.
- DNS and Gateway settings are only needed if using a static IP. Since we are using DHCP, there is nothing to change here. Tab to Done and press Enter.
- We will be using Windows DHCP so we do not need to enable IPFire’s DHCP server. Tab to OK and press Enter.
- Setup is complete. Press Enter.
- Login with root and verify that you can ping an external IP address like 4.2.2.2 or 8.8.8.8. Press CTRL+C to break the ping. If unable to ping, verify the network configuration is correct above.
- Create a Windows Server 2016 VM.
- Press CTRL+N, select Custom, click Next.
- Click Next, the default hardware compatibility is fine.
- Select Installer disc image file (iso) and click Browse. Go to the location from step 1.2 where the Windows Server ISO is located.
- Select the ISO and click Open.
- Click Next.
- Click Next to skip the Easy Install Information. Click Yes to accept the product key prompt.
- Enter a VM name and location. For this document, the name is W2016DC1 and D:\VMs\Virtual Machines\W2016DC1
- Click Next to select the default BIOS.
- Select One Processor and Two Cores. Click Next.
- Set RAM to 4096MB. If you have more than 16GB of RAM, you can increase to 6 or 8GB, if needed. Click Next.
- Select use host-only networking and click Next.
- Click Next to select the default I/O controller type.
- Click Next to select the default disk type.
- Click Next to create a new virtual disk.
- Change the Maximum disk size to 80.0 GB. Click Next
- Click Next to accept the default disk file name and location.
- Click Finish.
- Click Exit virtual machine settings.
- Click Network Adapter.
- Select Custom, VMnet15, and click OK
- Install Windows 2016
- Install Windows as you normally would.
- Configure Windows Server and Domain
- Enter the IP information. The IP needs to be on the same subnet as configured for the GREEN network. EX: 192.168.15.200, GW: 192.168.15.1, DNS: 127.0.0.1 since we’ll be creating a domain controller with DNS and DHCP services. *Remember to use the IP address entered in step 6.11.3 for the gateway address.
- You should be able to ping an IP address like 192.168.1.15 and 4.2.2.2, but not a DNS name.
- Change the name of your server and reboot.
- Start the Add Roles and Feature Wizard
1. Add the following roles:
–Active Directory Domain Services
–DHCP Services
–DNS Services
2. Follow the wizard’s steps.
3. Promote: Add a new forest.
4. Enter your domain name and follow the wizard. –you will get a warning about DNS, this will be resolved later.
- Configure DNS and DHCP
- DNS. We need to add a forwarder for our DNS settings.
- From Administrative Tools, open DNS
- Right-click on your server and click Properties.
- Click the Forwarders tab
- Click Edit, and add your external DNS servers like 4.2.2.1, 4.2.2.2, 8.8.8.8, and 8.8.4.4.
- DHCP
- Double-click DHCP from Administrative Tools
- Expand IPv4 and right-click, click New Scope from the menu.
- Enter an IP range, ex: 192.168.211.50 to 192.168.211.100
- The remaining settings can be default for now.
- When asked to configure scop options, verify “Yes” and click Next.
- Router/Default gateway will be the IP we used to configure the GREEN NIC, ex: 192.168.15.1
- Domain name and DNS should be pre-configured. You should see the server’s IP in IP address box, ex: 192.168.15.200
- WINS does not need to be configured at this time.
- When prompted to activate scope, verify “Yes” and click Next.
- Click Finish to complete the wizard.
- Right-click on the server’s name under DHCP, and click Authorize from the menu. Refresh and IPv4 should have a green circle with a white check mark
- More details for setting up an DC in Windows 2016 can be found here: https://blogs.technet.microsoft.com/canitpro/2017/02/22/step-by-step-setting-up-active-directory-in-windows-server-2016/
- Managing IPFire via web interface
- IPFire can be accessed via web browser. Enter Enter https://ipfire_ip-address:444, in this document it will be https://192.168.15.1:444
- You will get a certificate error when accessing the IPFire management page.
- Adding Client VMs
- Add your Windows Client OSes. Install Windows as usual, make sure to set your VM’s network to the custom VMnet15.
- Completion!
Here’s the all-in-one pic!
- VMware Workstation
- IPFire
- Windows 2016 DC via RDP
- Windows 10

Posted in Linux, Networking, Virtualization, VM OS Install, VMWare, Windows, Windows 2016, Windows 2016, Workstation | Tagged: Active Directory, All-In-One, Virtualization, VM Ware, vmware, Windows, Windows 10, Windows 2016 | 3 Comments »
Posted by essjae on January 17, 2019
Build a basic all-in-one lab in VirtualBox. This how-to shows you how to build a virtual Windows Active Directory environment isolated from your home or work network. See my follow-up post using VMware Workstation here: https://smudj.wordpress.com/2019/01/23/setting-up-an-all-in-one-windows-ad-test-environment-vmware-workstation-edition/
Note: I’m no AD expert, there are better, worse, and different ways to do this and you’re not required to use VirtualBox.
Requirements:
16GB RAM minimum
SSD or multiple HDDs
Quad-core or better CPU with hardware virtualization enabled
- Download the necessary software. Download the ISOs for the OSes you’ll be installing. For this example, I’ll be using IPFire and MSDN versions of Windows Server 2012R2 and Windows 10 Pro.
- VirtualBox: https://www.virtualbox.org/wiki/Downloads
- Windows OS Evaluation: https://www.microsoft.com/en-us/evalcenter/
- IPFire: https://www.ipfire.org/download/ipfire-2.21-core124
- Create your IPFire router VM
- Click New, enter the name of your router, ie “IPFire”
- Change the OS to Linux, Ubuntu 64bit is fine as the version. Click Next.
- Enter 512MB for memory. Click Next.
- Click Create for a new virtual HDD and select VDI. Click Next.
- Select Dynamically allocated and click Next.
- Change the location here if necessary. The 10GB default is large enough, click Create.
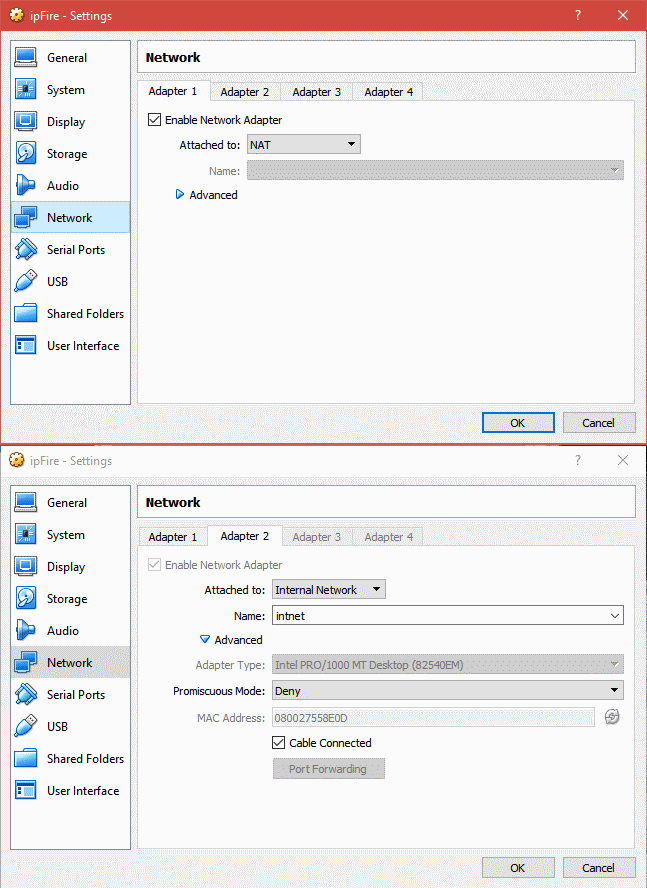
- Once created, click Settings and then click Network. We need to modify the networking options.
- Adapter 1 should be set to NAT or Bridged.
- Adapter 2 needs to be enabled and set to Internal Network. **Make note of the MAC address for adapter 2. You can find it by expanding the Advanced tab.**
- Click OK.
- Mount the IPFire ISO and install
- Click Settings on the IPFire VM. Click Storage.
- Click “Empty” next to the CD icon. Click the CD icon next to the far right to mount the ISO.
- Select “choose a virtual optical disk file” and browse to the ISO’s location.
- Select to mount. Click Ok to close the window.
- Power on the VM.
- Follow the IPFire prompts. Press enter to select, tab to move between selections, and the space bar to select check boxes.
- All defaults can be used.

- Configure IPFire
- Select the keyboard mapping. I’m using “us.” Press Enter to accept.
- Set your timezone. By pressing the first letter of your timezone, you can jump to that section. Select the correct timezone via the arrow keys and press Enter to accept.
- Enter a host name, the default is fine for our lab. Press Enter twice.
- The default domain is fine for our lab, press Enter twice to continue.
- Enter the root password and press Enter each time and once more to continue.
- Do the same for the admin password. Password can be the same for both for our lab purposes.–Network Configuration–
- Press Enter for “network configuration type”
- Select “Green + Red” and press Enter
- Arrow down to “drivers and card assignments.” and press Enter.
- Green: This is our internal network. Press Enter to select. Compare the MAC and select the correct interface. Press Enter to select the Interface.
- Red: This is our internet facing network, NAT or Bridged. Select RED, press Enter, and press Enter again to select the remaining interface.
- Tab over to done and press Enter.–Address Settings–
Press Enter to select.
GREEN:
1. Select GREEN and press Enter.
2. This is a new private, virtual network for our lab. Select a different IP subnet than your host network to avoid confusion.
3. The IP warning can be ignored as we are not logged in remotely. In this example, the subnet is 192.168.211.1/24. Since this will be the gateway, we can use 192.168.211.1. The subnet mask does not need to change.
4. Press Enter until you return to the GREEN/RED menu.
RED:
1. Select RED and press Enter.
2. Select DHCP. This interface will get the IP from the VBox NAT or your physical network’s DHCP server. You can modify the hostname here if necessary.
3. Tab to Done and press Enter.
–DNS and Gateway settings–
1. DNS and Gateway settings are only needed if using a static IP. Since we are using DHCP, there is nothing to change here. Tab to Done and press Enter.–DHCP Configuration–
We will be using Windows DHCP instead of IPFire’s. Tab to OK and press enter without enabling DHCP. Press Enter to close setup.
- Create Windows Server 2012 R2 VM
- From the VBox main men, click New.
- Enter a name, ex: “WS2012R2”, select the appropriate type (Windows 2012) and version (64-bit). Click Next.
- Set RAM to 4096MB. If you have more than 16GB of RAM, you can increase to 6 or 8GB, if needed. Click Next.
- Create a new virtual hard disk, click Create.
- Select VDI and click Next.
- Select Dynamically allocated, and click Next.
- Enter 80GB and click Create.
- Click Settings, then click Network.
- Select Internal Network.
- Select Storage. Click the CD under storage devices, then click the CD icon to the left of Optical Drive.
- Select Choose virtual optical disk file. Browse and select your Windows Server ISO.
- Click OK.
- Install Windows Server 2012
- Install Windows as you normally would.
- Configure Windows Server and Domain
- Enter the IP information. The IP needs to be on the same subnet as configured for the GREEN network. EX: 192.168.211.200, GW: 192.168.211.1, DNS: 127.0.0.1 since we’ll be creating a domain controller with DNS and DHCP services.
- You should be able to ping an IP address, but not a DNS name.
- Change the name of your server and reboot.Start the Add Roles and Feature Wizard
1. Add the following roles:
–Active Directory Domain Services
–DHCP Services
–DNS Services
2. Follow the wizard’s steps.
3. Promote: Add a new forest.
4. Enter your domain name and follow the wizard. –you will get a warning about DNS, this will be resolved later.
- Configure DNS and DHCP
DNS. We need to add a forwarder for our DNS settings.
1. From Administrative Tools, open DNS
2. Right-click on your server and click Properties.
3. Click the Forwarders tab
4. Click Edit, and add your external DNS servers like 4.2.2.1, 4.2.2.2, 8.8.8.8, and 8.8.4.4.
DHCP
1. Double-click DHCP from Administrative Tools
2. Expand IPv4 and right-click, click New Scope from the menu.
3. Enter an IP range, ex: 192.168.211.50 to 192.168.211.100
4. The remaining settings can be default for now.
5. When asked to configure scop options, verify “Yes” and click Next.
6. Router/Default gateway will be the IP we used to configure the GREEN NIC, ex: 192.168.211.1
7. Domain name and DNS should be pre-configured. You should see the server’s IP in IP address box, ex: 192.168.211.200
8. WINS does not need to be configured at this time.
9.When prompted to activate scope, verify “Yes” and click Next.
10. Click Finish to complete the wizard.
Right-click on the server’s name under DHCP, and click Authorize from the menu. Refresh and IPv4 should have a green circle with a white check mark.
9. Managing IPFire via web interface
You can access IPFire’s management console via a web browser.
Enter https://ipfire_ip-address:444, ex: https://192.168.211.1:444
Use “admin” and the password entered during step 4.
Note: You will get a certificate error when accessing the IPFire management page.

9. Adding Client VMs.
Nothing special here. Install Windows/Linux as usual. Make sure to select Internal Network for the VM’s network
10. Completion!
Here’s the money shot:
-VirtualBox
-IPFire VM
-WS2012R2 VM – domain controller for sw.net, DHCP and DNS roles
-Win10 VM – joined to sw.net, displaying IPFire’s web management page and network settings.

Posted in Computers, Networking, VirtualBox, Virtualization, VM OS Install, W2012, Windows 10, Windows 2012, Windows 2012 r2 | Tagged: All-In-One, vbox, virtual box, VirtualBox, Virtualization, Windows 10, Windows Server 2012 | 1 Comment »
Posted by essjae on August 7, 2017
This happened to me on Friday. My system slowed way down and got very laggy. Check Task Manager and Resource Monitor. My C: SSD was at 100% utilization.
The culprit, compatTelRunner.exe. This is apparently something that was used for Win7 compatibility checking for Win10.
I’ve got Win10 and this wasn’t an upgrade.
Anyway, you can disable this via task scheduler.
- Click Start, then type task scheduler and press Enter.
- On the Task Scheduler window, go to Task Scheduler Library\Microsoft\Windows\Application Experience
- In Application Experience, find Microsoft Compatibility Appraiser.
- Right-click Microsoft Compatibility Appraiser and select Disable.
- Kill any comptelrunner.exe tasks running and your system should become usable again.
- Alternatively, just restart your computer
Posted in Computers, Win7, Windows, Windows 10 | Tagged: Microsoft, Windows 10 | Leave a Comment »
Posted by essjae on April 21, 2017
I was trying to find an icon for this to put in a document, but couldn’t find one with the circle and all 4 arrows, so I made my own.
In case anyone else needs one, here you go.

It’s not perfect, but good enough for internal tech docs.
Posted in General, Win7, Windows, Windows 10 | Tagged: Icons, Win7, Windows, Windows 10 | Leave a Comment »
Posted by essjae on November 15, 2016
Need your serial number? Laptop’s docked, or workstation not easily accessible?
Here’s an easy way to get your vendor serial number:
- Start a command prompt, click start, type “cmd”, hit enter
- type “wmic bios get serialnumber”
This will return your Dell, Lenovo, etc serial number.
Note: If you have a custom or home built system, you’re not likely to get an serial number, you’ll probably see something like “system serial number” or “to be filled in by o.e.m”

Posted in Computers, Windows | Tagged: Dell, Hardware, Microsoft, Win7, Windows, Windows 10, Windows 8 | 1 Comment »
Posted by essjae on March 29, 2016
There are apparently a lot of people that don’t know about this, (or maybe google)?, so here’s a little publicity for Dell.
You can download the Windows recovery image for your Dell computer here:
http://www.dell.com/support/home/us/en/19/Drivers/OSISO
All you need is your service tag…and having purchased your Dell with Windows.
Here’s the full text of the site:
Recovery Image of Microsoft Windows
Download the recovery image
Download a recovery image of Microsoft Windows Operating System customized for your Dell product. Dell customization of the Windows image includes:
- Updated patches that address common issues for Dell systems.
- Dell support information.
The image provided in this download was configured to be bootable from either a DVD or USB.
Note: The recovery image contains the version of Windows that came installed on your computer. If you have upgraded your operating system, you will need to reinstall the upgrade after you have restored your system to the factory settings.
Identify your Dell PC
To ensure that we provided the correct image available for your Dell PC, provide the Service Tag of the system to which the image will be installed.
Dell’s Hosted Recovery Image is designed to work with Dell systems. It is not designed to be supported on non-Dell PCs.
Posted in Computers, Dell, Hardware, Windows | Tagged: Dell, Hardware, Recovery Image, Win7, Windows, Windows 10, Windows 8, Windows 8.1 | 1 Comment »
Posted by essjae on March 10, 2016
–This is no longer necessary, as Microsoft includes a default switch with NAT in the newer versions of Windows 10
And, it seems that NAT is no longer an accepted switch type
———-Deprecated———-
I found about this new way to create a NAT virtual switch in Hyper-V, it’s a lot less work than my previously documented method here: https://smudj.wordpress.com/2015/05/14/windows-10-hyper-v-setting-up-networking-shared-and-bridged-options/
https://technet.microsoft.com/en-us/library/hh848455.aspx?f=255&MSPPError=-2147217396
New-VMSwitch
Creates a new virtual switch on one or more virtual machine hosts.
Syntax
Parameter Set: NetAdapterName
New-VMSwitch [-Name] <String> -NetAdapterName <String[]> [-AllowManagementOS <Boolean> ] [-CimSession <Microsoft.Management.Infrastructure.CimSession[]> ] [-ComputerName <String[]> ] [-Credential <System.Management.Automation.PSCredential[]> ] [-EnableEmbeddedTeaming <Nullable [System.Boolean]> ] [-EnableIov <Boolean]> ] [-EnablePacketDirect <Nullable [System.Boolean]> ] [-MinimumBandwidthMode <VMSwitchBandwidthMode> {Default | Weight | Absolute | None} ] [-NATSubnetAddress <System.String> ] [-Notes <String> ] [-Confirm] [-WhatIf] [ <CommonParameters>]

Parameter Set: NetAdapterInterfaceDescription
New-VMSwitch [-Name] <String> -NetAdapterInterfaceDescription <String[]> [-AllowManagementOS <Boolean> ] [-CimSession <Microsoft.Management.Infrastructure.CimSession[]> ] [-ComputerName <String[]> ] [-Credential <System.Management.Automation.PSCredential[]> ] [-EnableEmbeddedTeaming <Nullable [System.Boolean]> ] [-EnableIov <Boolean]> ] [-EnablePacketDirect <Nullable [System.Boolean]> ] [-MinimumBandwidthMode <VMSwitchBandwidthMode> {Default | Weight | Absolute | None} ] [-NATSubnetAddress <System.String> ] [-Notes <String> ] [-Confirm] [-WhatIf] [ <CommonParameters>]

Parameter Set: SwitchType
New-VMSwitch [-Name] <String> -SwitchType <VMSwitchType> {Private | Internal | External} [-CimSession <Microsoft.Management.Infrastructure.CimSession[]> ] [-ComputerName <String[]> ] [-Credential <System.Management.Automation.PSCredential[]> ] [-EnableEmbeddedTeaming <Nullable [System.Boolean]> ] [-EnableIov <Boolean]> ] [-EnablePacketDirect <Nullable [System.Boolean]> ] [-MinimumBandwidthMode <VMSwitchBandwidthMode> {Default | Weight | Absolute | None} ] [-NATSubnetAddress <System.String> ] [-Notes <String> ] [-Confirm] [-WhatIf] [ <CommonParameters>]
Example
New-VMSwitch -SwitchName "Virtual Switch" -SwitchType NAT -NATSubnetAddress "172.16.0.0/12"
Posted in Hyper-V, Uncategorized, Windows 10 | Tagged: Hyper-V, Microsoft, Virtualization, Windows 10 | 2 Comments »
Posted by essjae on March 7, 2016
Note: This assumes you’ve already got the RSAT tools installed. RSAT for Windows 10
Building on my post here for Hyper-V manager:
Running Hyper-V Manager as a different user in Windows 10 (Runas)
You can use the same method to get Active Directory Users and Computers (ADUC) and DNS MMC admin consoles working if you’re logged in with your Microsoft account versus your domain account:

DNS shortcut:
C:\Windows\System32\runas.exe /savecred /user:domain\username "cmd /c Start /B %SystemRoot%\system32\mmc.exe %SystemRoot%\system32\dnsmgmt.msc""
Icon path:
%SystemRoot%\system32\dnsmgr.dll
ADUC shortcut:
C:\Windows\System32\runas.exe /savecred /user:domain\username "cmd /c Start /B %SystemRoot%\system32\dsa.msc""
Icon path:
%SystemRoot%\system32\dsadmin.dll
When you double-click, you’ll get prompted for the password (if you haven’t already) and also for UAC


DHCP is a little more involved as the RSAT doesn’t include the DHCP manager. NOTE: this is not currently supported by MS
- 1. copy dhcpmgmt.msc and dhcpsnap.dll.mui from %windir%\system32\system32\en-us on the 2012 server to the same location on the w10 pc
- copy dhcpsnap.dll from %windir%\system32\ on the 2012 server to the w10 pc
- From an admin cmd prompt run: regsvr32.exe dhcpsnap.dll
- Create the short-cut: C:\Windows\System32\runas.exe /savecred /user:domain\username “cmd /c Start /B %SystemRoot%\system32\mmc.exe %SystemRoot%\system32\dhcpmgmt.msc””
- Change Icon path: %SystemRoot%\System32\dhcpsnap.dll
You’ll need to manually add your DHCP server each time you run this. I haven’t found a way to save the config.
*This was done with Windows 10 Build 1511 and Windows Server 2012.
For additional snap-ins, just modify the last part of the short-cut with the correct mmc path for the add-in you want.
Posted in Sysadmin, Windows, Windows 10, Windows 2012 | Tagged: ADUC, DHCP, DNS, RSAT, Windows, Windows 10, Windows Server 2012 R2 | Leave a Comment »
Posted by essjae on February 10, 2016
I hit a small issue while working on building up a test SCCM/SCVMM lab in Hyper-V.
My primary system (call it One) has Windows 10 and is domain joined, but I’ve been doing the “Microsoft” thing and logging in with my “Microsoft” account instead of my local domain account.
I’ve got two Hyper-V hosts, one on Windows Server 2012 R2 and another running on Windows 10* (call it Two). I’ve been able to launch my Hyper-V Manager on One and connect and manage the Hyper-V VMs on Server 2012.
However, I hit a roadblock trying to connect to Two. The first thing I tried after failing and getting some error messages was to configure winrm.
On Two:
I opened an administrator PowerShell window and ran
winrm quickconfig
and followed the wizard and was able to start the winrm service and open the firewall.
On One:
Again in a administrator PowerShell window, I ran:
Enable-WSManCredSSP -role client -delegatecomputer two.mydomain.com
Failure! I got a big text message in red that said to run winrm quickconfig.
This is odd, since I did none of this to connect to the Server 2012 Hyper-V instance.
I then shift+right-clicked on Hyper-V Manager and ran it with my domain credentials and it ran! Ah ha! No problem, just create a runas shortcut for Hyper-V Manager.
C:\Windows\System32\runas.exe /user:mydomain\myusername /savecreds "%windir%\System32\mmc.exe "%windir%\System32\virtmgmt.msc""
Again, no joy. Launching my new short-cut from a command prompt showed the error:
740: The requested operation requires elevation.
The command needs ADUC elevation, with some Googling** I finally found a solution, first launch a cmd prompt and then the command. This allows you to receive the ADUC prompt and accept it.
C:\WINDOWS\system32\runas.exe /savecred /user:mydomain\myusername "cmd /c Start /B %windir%\System32\mmc.exe "%windir%\System32\virtmgmt.msc""
The path to the Hyper-V Manager icon is here:
%ProgramFiles%\Hyper-V\SnapInAbout.dll
...
*I don’t recall my logic in installing Windows 10 here instead of Server 2012…it may have just been laziness, an upgrade to Win10 from the previous Windows 8.1 OS that was installed.
**http://serverfault.com/questions/374342/run-active-directory-admin-center-as-another-user
Posted in Hyper-V, Uncategorized, Virtualization, Windows 10, Windows 2012 | Tagged: Hyper-V, Microsoft, powershell, RunAs, Virtualization, Windows 10, Windows 2012 r2, winrm | 1 Comment »


